Do you have a social media image strategy? Images tend to encourage more engagement and therefore, play an important role in your social media content plan. If you haven’t developed one already, here are some tips to help you prepare a strategy for incorporating images into social media.
1. Include Images in Your Editorial Calendar
Just like you schedule blog posts on an editorial calendar, schedule images too. Whether that means images to go along with each blog post or a separate social media update (such as a Motivational Quote on a Photo), plan ahead and consider the time necessary for creating image-driven content.
If you are a pro in Photoshop, then maybe it only takes you a few minutes to create an awesome image…but if you are like me, and not a pro in Photoshop or graphic design, then you need more than 5 minutes to create something somewhat attractive.
For example, if it takes you an hour to create a blog post (500 words or less), but you don’t take into account the additional hour to find and customize an image to go along with it, you are not being realistic in how much time is necessary in creating blog posts.
Time-Saving Tip: Start a folder of images to be used in future blog posts. If there are certain topics you blog about each month, then start a collection of images to use in a pinch or just to plan ahead.
Start collecting pictures/images you’ve taken/created or any you’ve found through search (keep in mind that you should only use photos with a creative commons license or with permission from the photographer/designer).
2. Make Sure Every Blog Post Has At Least One “Pinnable” Image
Even if you aren’t active on Pinterest, people who read your blog are, and may Pin your blog post to one of their Pinterest Boards. So it’s a good idea to make sure you have at least one image in your blog post that would serve as an attractive Pin for your post.
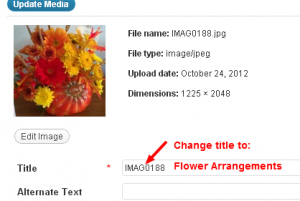
When you are uploading the picture to your blog, make sure the image’s title can be used as a description in Pinterest: the title of your blog post, a short description of the post, your site name, etc…
For example, if my blog post title is “How to Display Fall Flowers” and I upload a photo of my flower arrangement, I don’t want the image title in WordPress to be “IMAGE123“. I want my image title to be something descriptive like: “Fall Flower Arrangements – How to Display – 3 Easy Steps“. See an example below:
It’s also a great idea to overlay your site’s URL on the image, so Pinterest users can quickly see where the post came from. In the example below, I used Picmonkey (see tip 3 below for online photo editor options) to overlay my website URL plus the post’s title:
If someone were to Pin this image, the Pin itself would show Pinterest users where it originated and what the blog post is about (please note: this is just an example – I did not arrange these flowers and do not have any advice on this topic!)
3. Use Free Online Tools to Make Your Own Share-able Images
There are a variety of free online tools to help you with your images. Here are a few I’ve tried or heard great things about. If you have any others to share, I’d love to hear about them on our Facebook Page.
Photo editors:
- Pixlr – I haven’t used this one; but hear good things about it
- Picasa – Relatively simple to use: you have to download it and then can use to add text or effects to images
- PicMonkey – My favorite editor right now; no download necessary, easy to use, make collages, upload jpg and png files
Note: on the flower arrangement example above, I took that photo using Instagram, and used Webstagram to view and save the image to a jpg file on my computer. Then I uploaded the jpg file to PicMonkey and added the overlays (in about 10 minutes).
Quote-making tools:
- ShareAsImage – Create quotes with several basic options/features
- Quozio – A new favorite for easily creating great-looking image quotes
- Pinstamatic – Easy-to-use with options for quotes, photos (from your computer or Instagram) and more
Photo-editing/Quote-making tools will come and go, so don’t get too caught up in which one you should use. Try one or two and if they help you create great-looking images in a reasonable amount of time, then go with it!
I’ll keep you updated on any new time-saving tools I find and use or any that come strongly recommended. So let me know what you think of the ones I’ve shared here!
Update: Make sure you check out 3 More Tips for Creating A Social Media Image Strategy for additional ideas!


