 While Facebook makes it clear that Pages are to be used for business and your Personal Profile is “…for personal, non-commercial use only”, if you are a business owner, you want to make sure your Profile shines a positive light on your business. Customers, potential customers, colleagues or potential business partners may sometimes find your personal profile before your business Page and form an opinion of your business and/or brand then.
So you want to make sure that:
- Your business information can easily be found on your Personal Profile
- Your Timeline promotes the best image of you and your brand – especially if you have turned on the Follow feature (formerly called the Subscribe feature).
The following personal branding tips will help:
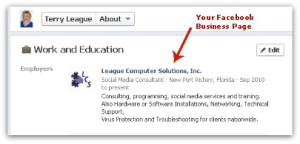
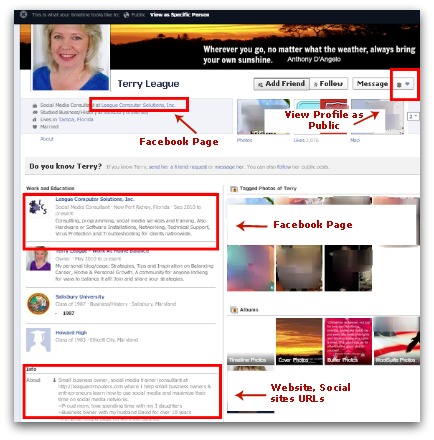
#1: Make sure your Facebook Page is listed in the Work and Education area of the About section.
If you’ve created your Page, you should be able to add it to Work by typing in the name of the Page and clicking on the link that pops up.
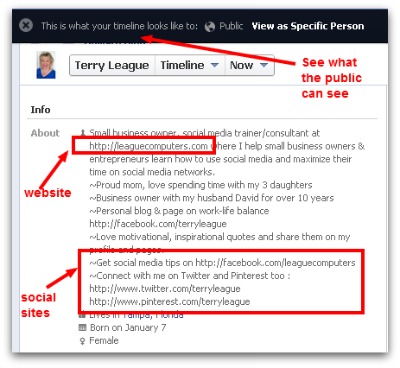
#2: Put your website and social media site URLs in the About box.
This makes it easy for other users to connect with you on additional social media sites (and your website). Then share business highlights (memberships in organizations or associations, awards, etc.) along with any personal information that tells other users a little bit about you.
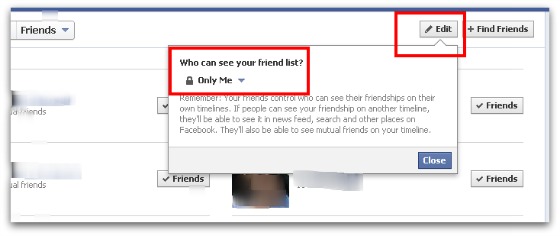
#3: Hide your Friends list and activity if you are concerned about privacy or a professional image (sometimes your Friends’ photos aren’t the most professional-looking images).
From your Timeline, click on your Friends box. Then click on the Edit button on the next screen. Choose “only me” for Who Can See Your Friend List?
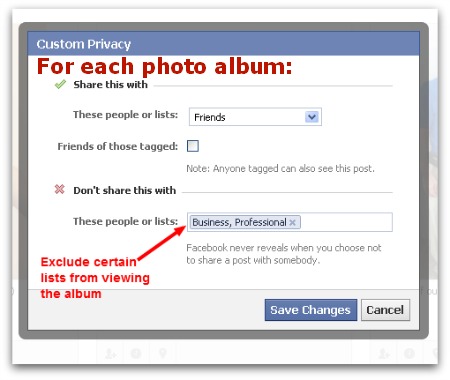
#4: Put privacy controls on your photo albums and make separate albums for groups of Friends.
For example, I keep a “public” photo album that anyone (Friends or Followers) can view and a “family/close friends-only” album, where I share more of my kids’ pictures. When you upload a new photo, take note of the privacy setting and change it when necessary.
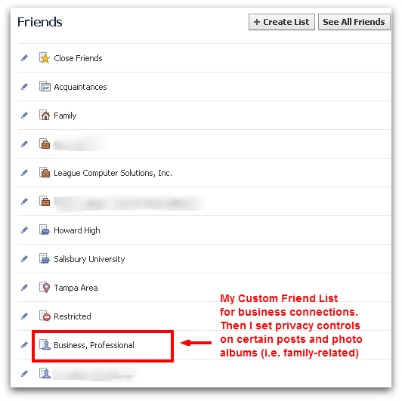
#5: Create a custom Friend List for business contacts.
Facebook automatically creates several Friend lists (close friends, family, schools, workplace, hometown, etc) but you can add your own custom Friend list(s).
On your Home/News Feed, click on the Friends option in the left navigation menu. On the next screen you can click on Create a List and make a list for business contacts/colleagues (call it whatever you want as it is only visible to you). Then whenever you add a new Friend, immediately place them on the appropriate Friend List. **Don’t forget to do this step**
Use this “Business Contacts” list for networking and virtual events: you can click on the List any time to view posts from only those members. If you create Events on your Facebook Page, you can “join” the event using your Personal Profile and then invite friends. When inviting friends, you can bring up specific friend lists (i.e. your Business Contacts list) and quickly invite only your business contacts.
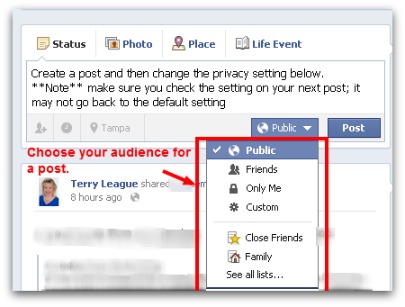
#6: Change the visibility of individual posts
If you have the visibility of your posts set to “public” by default, you can change the visibility to friends-only (or to a custom Friend list). This is a good way to communicate with family or close friends when you don’t want to share that information with your business contacts. *Note*: post visibility may not automatically revert back to your default setting, so make sure you check it on the next post you make.
#7: Remember to Like other friends’ Pages using your Personal Profile .
When you Like someone’s Business Page make sure you do so using Facebook as your Personal Profile. This helps them build their official Fan count (number of Likes) and improves their Page’s EdgeRank (visibility to other users).
You can also Like a Page using your Page – this is a good strategy for sharing another Page’s content or featuring them as a favorite on your Page. To use Facebook as your Page, just click on the “gear” icon in the upper right corner of your Profile’s Home page and you should see the Page(s) you manage appear in the drop-down window. Then click on the appropriate one and go to the Pages you want to Like.
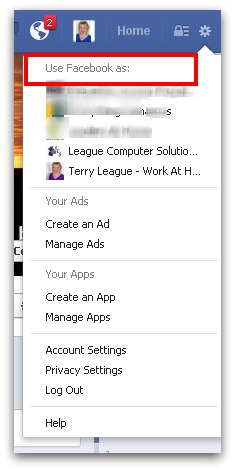 When you are done Liking Pages as your page, just click on the gear icon and choose to use Facebook as your Personal Profile.
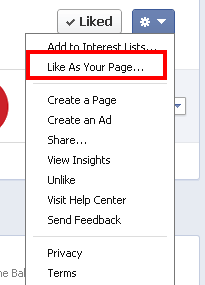
Another quick way to Like other pages as both your Personal Profile and Business Page is to go the Page you are going to “Like” and click on the option “Like as your Page” right after you’ve clicked the Like button. See the image below:
Now you’ve given a Like as your Personal Profile to increase the Page’s fan count and you’ve Liked as your Page to share posts, and feature the page on your Page’s Timeline.
#8: Bonus Tip – View your Personal Profile as “Public”
Have you checked to see how your profile appears to the “public”? It’s easy to check and will help point out some areas where you can improve your personal branding.
To view your Profile as the general public, go to your Timeline and click on the arrow next to the “gear” icon (just below your Cover Photo, on the right side).
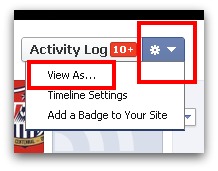 Click on “View As…” and you’ll see your Profile as if you were the public and not a Facebook Friend. See my Profile below for an example, with the areas discussed above noted by the red boxes –
*Note* depending on your Privacy settings, you may not be able to see the same information as pictured in my Profile.
Spend some time updating and optimizing your Personal Profile/Timeline so when you make new connections on Facebook you are creating a positive brand image for you and your business.
