 Images play a big role in social media – whether it’s on blog posts, Facebook updates, Pinterest Pins or an Instagram account. So you need to make sure that you have a system in place for creating and sharing your images.
In an earlier blog post I shared 3 tips on creating a social media image strategy. Those tips are:
- Include images in your Editorial/Content Calendar
- Make sure every blog post has a “Pinnable” Image
- Use free online tools to create Share-able Images
There are a few more tips I suggest you add to your Image Strategy:
4. Schedule Time To Take Photos
Make an appointment with yourself on a regular basis (once a month, once every 2 weeks) to take new photos for your social media accounts. I’m the first to admit that my photography skills are limited, so I definitely recommend using a professional photographer for important images.
But for your more casual, day-to-day postings on social media, your audience doesn’t expect every shot to be perfect. They are more interested in seeing you or your business as a “real” person who can identify with them.
So go out in your community or nature, get behind-the-scenes shots or just experiment with some interesting colors for your casual, amateur photos. With some of the free photo editing tools out now, you can add more excitement to your photos before you publish them.
You can also give this assignment to an assistant, intern or in my case, a family member. I ask my daughter, who has a talent for photography and video, to take interesting photos for me, and I’ve also used many of my dad’s fabulous nature shots as background images.
5. Create Your Own Templates (to Save Time and Brand your Business)
Once you’ve taken a photo, use one of my favorite tools – PicMonkey – to create a template. Check the image size guidelines on the social sites you use and then re-size the photo in PicMonkey.
You can then make a Text Overlay to watermark your photos and put your site link on each one. Save the finished version with a unique name and then re-use your “templates” in blog posts or as backgrounds for image quotes. Simply go back into PicMonkey (or another editor) and add the new text, then save as a new name for each new image post.
The example below is a photo where I’ve placed a simple overlay of our website link. I can save this image as “sunset template.jpg”. Then when I want to post a new image quote, I can bring up this image, overlay text (the quote) and then save with a new filename (the quote or summary of the quote, so when others “pin” this to their Pinterest account, the title of the image shows up correctly in their Pin’s description).
6. Use Instagram to Quickly and Easily Share Images
Set up an Instagram account if you haven’t already. Then connect your Instagram account to your Facebook Page. You’ll be able to easily share image posts with your Fans.
Sharing Instagram images to your Twitter account isn’t quite as simple, because the basic sharing function displays the image link; not the photo itself.
The screen shot below displays how an Instagram photo normally shows up on Twitter: notice the instagram.com link. You have to click on the link to see the photo.
A great tool that I’ve found extremely helpful is a “recipe” from the IFTTT (If this, then that) site that shares Instagram photos as Twitter pictures on my account. Click here to check out IFTTT, where you can set up a free account. Then check out the public “Recipe” (a formula created on the IFTTT site that uploads Instragram shots as Twitter pics).
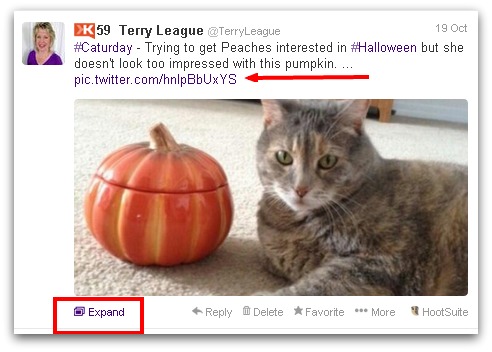
The screen shot below displays how my Instagram photo shows up on Twitter with the IFTTT Recipe. Twitter just launched automatic photo/Vine video previews this week, so this Recipe is an even better tool now! (Users simply click on Expand to see the full Instagram photo.)
So use these 6 tips to create a social media image strategy that keeps your content organized, and allows you to build better relationships with your audience through images!
photo courtesy of Salvatore Vuono / FreeDigitalPhotos.net


