If you are new to Google Plus, or have an account, but never really got into the habit of using it, the following tips will help you get more comfortable using the site.
#1: Start with a Personal Account (until you get the hang of things)
Personal Accounts on Google+ are not as restrictive as what you’re used to on your Facebook Personal Profile: connecting with people who are not already your friends is part of what makes Google+ fun!
You can talk about your business, network with other business people, and show a more personal side to your brand without worrying about boundaries with family/friends/business contacts. (Of course, if you start spamming people, you won’t make many new connections, so don’t do that.)
Creating a Business Page on Google+ is easy (and I recommend it), but if you are brand new to the site, think about the time it takes to manage two separate accounts as you are learning the ropes. You may be better off with only one account now and focus on making connections on your Personal Account. Then you can “announce” your business Page a little later when it’s up and running.
Note: If you have additional staff or outside help, then don’t put off creating your Business Page; set up both accounts, and start sharing your Business Page posts to your Personal Account.
#2: Use Photos on G+
Cover photos: This area includes a large photo that you can upload with graphics/text about you and your business, plus the Profile Photo and description on the far left.
Click here for a cheat sheet on G+ image sizes at mediabistro.com
In-house photo editing: when you upload a photo to Google+ you can edit it using some basic tools on the site. You’ll see an “edit photos” option after you upload the photo. Use this basic editor for cropping, text overlays and some special effects.
Photo quality overall on Google+ is great, so consider using more visual content in your Google+ posts. There are lots of photography “theme” days on the site and by using the appropriate hashtag(s), you can easily participate in them. (e.g. #WordLessWednesdays, #Caturday, etc.)
Click here to see two helpful resources for finding these themes.
#3: Optimize Your “About” Tab
As with any social profile, you want to optimize the space you’re given to share something about you/your business with other users.
You’ve got plenty of space to write a few paragraphs, with clickable links, on your About tab.
There are some important fields to take note of because of where else that information shows up:
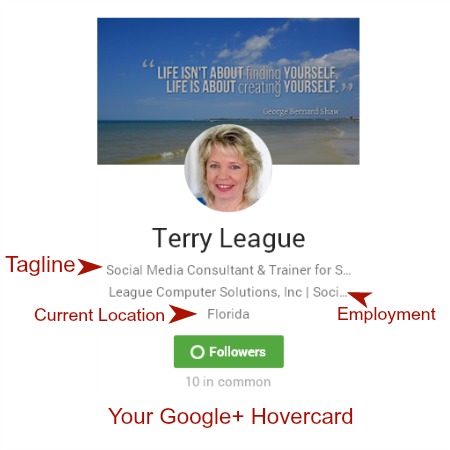
Tagline – visible on the “hover card” that pops up whenever someone hovers over your name in their feed
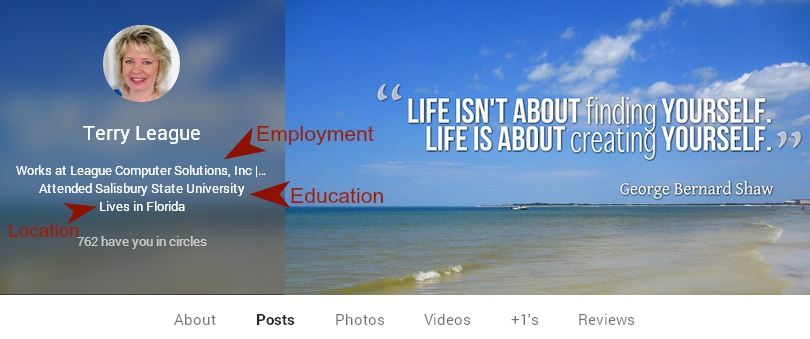
Employment – visible on your profile photo box and visible on the “hover card” that pops up whenever someone hovers over your name in their feed
Education – visible on your profile photo box
Locations – visible on your profile photo box and visible on the “hover card” that pops up whenever someone hovers over your name in their feed
See the image below for an example of your Hovercard:
And this image shows where your information appears under your Profile Photo on the Cover Photo:
Links: Fill in the Links section with the URLs for your other profiles, websites, and sites you are a Contributor to (this is part of claiming your Google authorship).
Here are some resources that walk you through the steps required to claim your authorship on Google+:
http://blog.kissmetrics.com/google-authorship/
https://plus.google.com/authorship
https://support.google.com/webmasters/answer/2539557?hl=en
#4: Use Hashtags
If you’re not familiar with hashtags, then just think of them as an easy way to find information and/or people based on topics or unique events/names.
Hashtags serve as a way to organize all the data we’re consuming on the internet. For marketers, using hashtags on a regular basis helps you and/or brand to be found when others are searching for those topics.
Use hashtags on Google+ to connect with other users by searching for topics and then adding a +1 or comment on their posts. Organize your own posts by including topic-related hashtags, as well as unique hashtags for branding purposes.
Google+ will automatically add “related hashtags” to each of your posts if you do not include a minimum of three yourself. (Found in the upper right corner of each post.)
You can search by hashtags within Google+ in the G+ search bar or by clicking on the Explore tab to see trending hashtags.
#5 Organize your Circles
The people and Pages you add (follow) on Google+ are put into Circles. Similar to Facebook Friend/Interest Lists and Twitter Lists, Google+ Circles are used to organize your contacts on the site.
You’ll see a variety of ideas and systems on how to organize your Circles, so spend some time thinking about how you plan on using your Google+ Account when you create new Circles.
A few ways to create Circles:
Topics – Pages and people who post about science, business…whatever topics interest you.
Relationships – New contacts can all go into an “Aquaintance” Circle and then as you build a relationship, move them into new Circles based on levels of contact like future business partners, potential client, customers, peers, etc.
Events – Create Circles based on offline/online events.
Shared Circles:
You may see other users “sharing” a Circle of people/pages they recommend, based on topics or other qualifiers. You can then add the entire Circle (as a new Circle) to your profile or you can view the Circle and choose to add specific people/pages to your existing Circles.
This is a great way to connect with large numbers of people in a quick way, but just be careful about the quality of the connections you’re making in Shared Circles.
Sharing Your Posts to Your Circles:
It can be a little confusing to understand how to share your posts with the Circles you’ve created. Sharing a post to Public means that anyone who has you in a Circle can see the post, and the post is visible on your Profile.
It gets a little trickier when you start selecting specific Circles to share your post with.
If you create a Circle for clients and then send a post to your “Clients” Circle only (and not the Public option), the people in that Clients Circle are the only ones who see it, as long as they also have you in their Circles.
Click here to check out this helpful Infographic, which explains Circles.
#6 Use Text Formatting
You’ll see Google+ posts of all lengths. Many experienced users recommend writing longer posts or using Google+ as a mini-blogging platform. My recommendation is to test a few posts of different lengths: what works for others may not work best for you and your community.
One great thing about any type of post you create on Google+ is the text formatting feature. Simple text formats include:
Bold text: Place an asterisk * before and after text: *your text* shows up as your text.
Italics: Place an underscore _ before and after text: _your text_ shows up as your text .
Strikethrough: Place a dash/hyphen – before and after text: -your text- shows up as your text.
You can also edit your posts after they’ve been published.
Tag people and/or pages with either the + or @ sign. Type the + sign, then start typing their name; you should see it pop up in a window and you can click on their name.
Once you’ve tagged a user or page, their name will appear in blue text surrounded by a grey box.
#7: Check Out Additional Features: Communities, Hangouts and Events
Look into these features as you become more comfortable on the site.
Communities are similar to Facebook Groups and are a great way to connect with users who share your interests.
You can also start your own Community, but I recommend joining a few first to get a feel for how they are managed.
Click on your Communities Tab in the navigation menu or search for communities by topic within Google+ (e.g. type “travel communities” in the Search bar if you want to find communities related to travel).
Hangouts are a great way to talk to other users, colleagues, clients in a live format. The standard Hangout can have up to 10 people on live.
Hangouts on Air allow you to create a public broadcast for a larger number of people. Your Hangout on Air is saved as a YouTube video.
You can create Events on Google+ and send out invitations (including people who don’t have a Google Plus account). The event page contains all the information about the event including comments, attendees, and photos.
Any photos taken during the event are added live to the event page and shared with everyone who was invited to the event (through photo albums).
As you get more comfortable on Google+, you’ll find it a fairly easy-to-use site with a lot of potential for building a great personal or business network.
As I recommend for any social network, set aside time to use Google+ daily or at least three days each week for consistent growth. Sharing great content (yours and others’), engaging with other users (+1s and comments) and using the site on a regular basis are the basic keys to success!


